しふみんのブログ

しふみんのブログです。

AWS CLIのCommand completionとauto-promptを有効にする

最近AWS CLIを使い始めました。
コマンドに不慣れなため自動補完的なsomethingが欲しいと思い調べたところ、AWS CLIにはCommand completionとauto-promptがあることが分かりました。
というわけで、設定をしていきます。

自分の環境

  • シェルはZsh
  • Homebrewでawscliをインストール
$ echo $SHELL
/opt/homebrew/bin/zsh
$ aws --version
aws-cli/2.15.0 Python/3.11.6 Darwin/23.1.0 source/arm64 prompt/off

ここの prompt/off はauto-promptとは関係がないっぽい。

Command completion

docs.aws.amazon.com

いわゆるコマンドの自動補完です。
コマンド入力時にタブキーを押下すると入力内容が自動的に補完されます。
利用するためにはシェルのprofileに設定を追加する必要があります。
Zshの場合は .zshrcに設定を追加します。

~/.zshrc

autoload bashcompinit && bashcompinit
autoload -Uz compinit && compinit
complete -C '/opt/homebrew/bin/aws_completer' aws

completeにはaws_completerのpathを設定する必要があります。
Homebrewでawscliをインストールしている場合、aws_completerも同時にインストールされており、そのpathは /opt/homebrew/bin/aws_completer となっています。

Bashの場合は、compinit周りの設定が不要なため.bashrcに下記の設定のみを追加します(たぶん)

complete -C '/opt/homebrew/bin/aws_completer' aws

aws (awsの後ろにスペース)の状態でタブキーを押すと次の入力が補完されます。
コマンドだけではなくサブコマンドやオプションの内容も補完されます。
(aws-cliってこんなにサブコマンドの種類があるのか。。。)

Image from Gyazo

auto-prompt

docs.aws.amazon.com

コマンド入力時に対話式のプロンプトを用いてコマンドとそのオプションを理解しながら入力できる機能です。
利用するためには、CLI実行にオプションで設定する、環境変数に設定する、設定ファイルに設定するの3択がありますが、ここでは設定ファイルに設定を追加します。
~/.aws/configに設定を追加します。

~/.aws/config

[default]
cli_auto_prompt = on

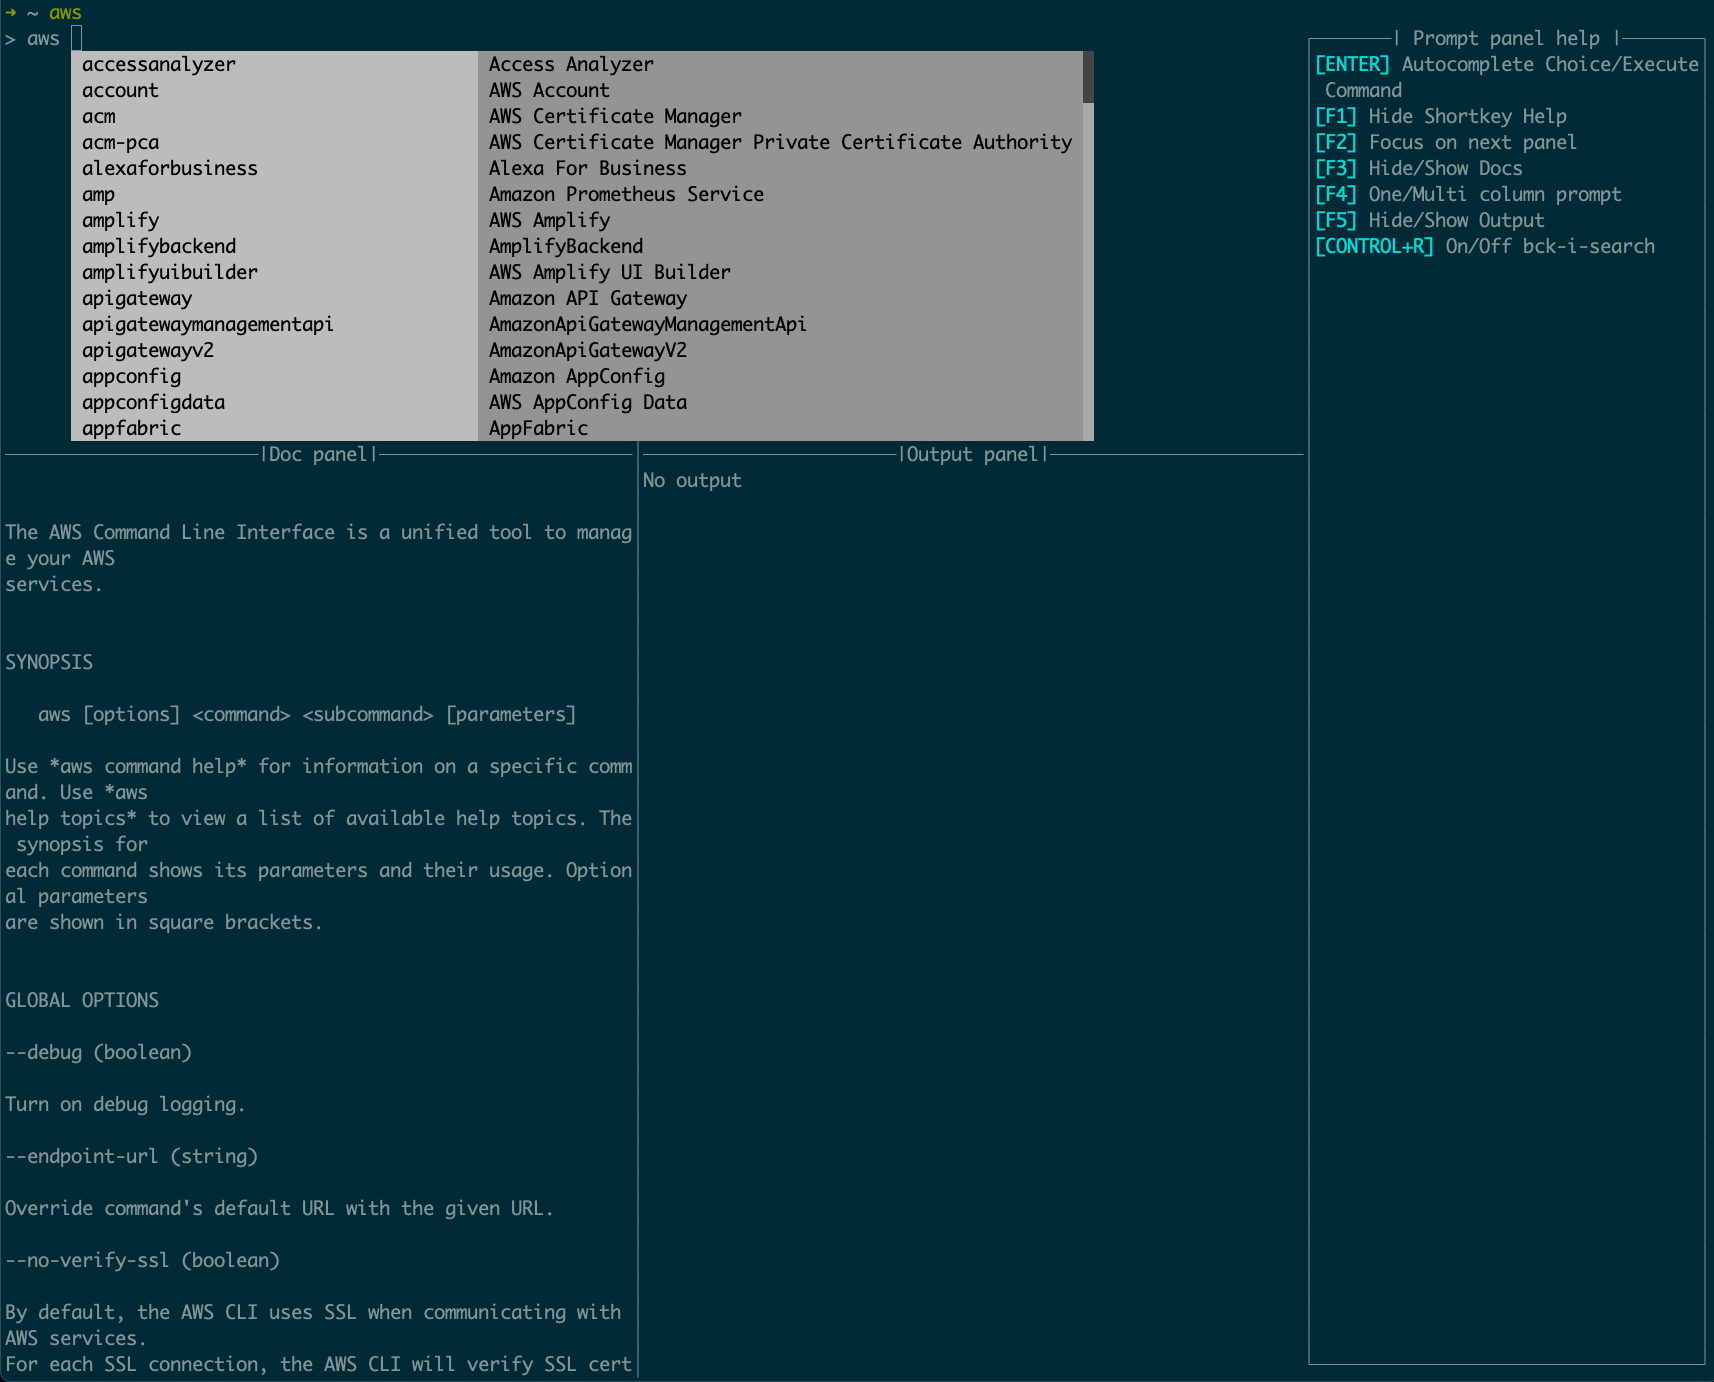
aws だけ入力してコマンドを実行すると、下記のようなpromptが表示されます。
(ドキュメントや出力パネルもあってリッチや。。。)

Image from Gyazo

また、 cli_auto_prompton 以外にも on-partial の設定もあります。

[default]
cli_auto_prompt = on-partial

違いは、

  • on : full auto-promptモード。 aws コマンド実行時に常時auto-promptを利用するモード
  • on-partial : partial auto-prompモード。 aws コマンドが不完全な場合(サブコマンド等などで)にauto-promptを利用するモード

docs.aws.amazon.com

cli_auto_prompt = on-partial の方はコマンドが完全な場合はそのまま実行されるため、通常に利用する分はこちらの方が便利かもしれません。
auto-promptに頼りたい場合はコマンドがあやふやな場合であると思うため。

/

auto-promptの方はやりすぎな気もしますが、AWS CLIの理解を深めるためにしばらく使ってみようかと思います。

参考

Amazon Linuxでffi gemをnative buildするのに必要な依存パッケージ

AWSが提供しているlambda/rubyのbaseイメージでffi gemをインストールしようとしたら、native buildで失敗しました。

gallery.ecr.aws

再現

Gemfile

# frozen_string_literal: true

source 'https://rubygems.org'

gem 'ffi'

Dockerfile

FROM public.ecr.aws/lambda/ruby:3.2

# 通常はGemfile.lockもコピーするだろうけど再現には必要ないため省略
COPY Gemfile ${LAMBDA_TASK_ROOT}/

RUN gem install bundler && bundle install

こんな環境でdocker buildしてbundle installしようとすると、

$ docker build --platform linux/arm64 -t lambda-ruby-test:test .

[+] Building 2.5s (7/7) FINISHED                                                          
 => [internal] load build definition from Dockerfile                                 0.0s
 => => transferring dockerfile: 263B                                                 0.0s
 => [internal] load .dockerignore                                                    0.0s
 => => transferring context: 2B                                                      0.0s
 => [internal] load metadata for public.ecr.aws/lambda/ruby:3.2                      0.0s
 => CACHED [1/3] FROM public.ecr.aws/lambda/ruby:3.2                                 0.0s
 => [internal] load build context                                                    0.0s
 => => transferring context: 106B                                                    0.0s
 => [2/3] COPY Gemfile /var/task/                                                    0.0s
 => ERROR [3/3] RUN gem install bundler && bundle install                            2.4s                      2.4s
------                                                                                    
 > [3/3] RUN gem install bundler && bundle install:
(略)
#0 1.937 Fetching gem metadata from https://rubygems.org/..
#0 1.976 Resolving dependencies...
#0 1.979 Fetching ffi 1.16.3
#0 2.144 Installing ffi 1.16.3 with native extensions
#0 2.327 Gem::Ext::BuildError: ERROR: Failed to build gem native extension.
#0 2.327 
#0 2.327     current directory: /var/lang/lib/ruby/gems/3.2.0/gems/ffi-1.16.3/ext/ffi_c
#0 2.327 /var/lang/bin/ruby extconf.rb
#0 2.327 checking for ffi.h... *** extconf.rb failed ***
#0 2.327 Could not create Makefile due to some reason, probably lack of necessary
#0 2.327 libraries and/or headers.  Check the mkmf.log file for more details.  You may
#0 2.327 need configuration options.
(略)
#0 2.327 /var/lang/lib/ruby/3.2.0/mkmf.rb:490:in `try_do': The compiler failed to
#0 2.327 generate an executable file. (RuntimeError)
#0 2.327 You have to install development tools first.
#0 2.327 
#0 2.327        from /var/lang/lib/ruby/3.2.0/mkmf.rb:616:in `block in try_compile'
#0 2.327        from /var/lang/lib/ruby/3.2.0/mkmf.rb:565:in `with_werror'
#0 2.327        from /var/lang/lib/ruby/3.2.0/mkmf.rb:616:in `try_compile'
#0 2.327        from /var/lang/lib/ruby/3.2.0/mkmf.rb:1157:in `block in have_header'
#0 2.327        from /var/lang/lib/ruby/3.2.0/mkmf.rb:989:in `block in checking_for'
#0 2.327        from /var/lang/lib/ruby/3.2.0/mkmf.rb:354:in `block (2 levels) in postpone'
#0 2.327        from /var/lang/lib/ruby/3.2.0/mkmf.rb:324:in `open'
#0 2.327        from /var/lang/lib/ruby/3.2.0/mkmf.rb:354:in `block in postpone'
#0 2.327        from /var/lang/lib/ruby/3.2.0/mkmf.rb:324:in `open'
#0 2.327        from /var/lang/lib/ruby/3.2.0/mkmf.rb:350:in `postpone'
#0 2.327        from /var/lang/lib/ruby/3.2.0/mkmf.rb:988:in `checking_for'
#0 2.327        from /var/lang/lib/ruby/3.2.0/mkmf.rb:1156:in `have_header'
#0 2.327        from extconf.rb:10:in `system_libffi_usable?'
#0 2.327        from extconf.rb:46:in `<main>'
#0 2.327 
#0 2.327 To see why this extension failed to compile, please check the mkmf.log which can
#0 2.327 be found here:
#0 2.327 
#0 2.327 /var/lang/lib/ruby/gems/3.2.0/extensions/aarch64-linux/3.2.0/ffi-1.16.3/mkmf.log
#0 2.327 
#0 2.327 extconf failed, exit code 1
(略)
#0 2.327 An error occurred while installing ffi (1.16.3), and Bundler cannot continue.
#0 2.327 
#0 2.327 In Gemfile:
#0 2.327   ffi
------
Dockerfile:8
--------------------
   6 |     COPY Gemfile ${LAMBDA_TASK_ROOT}/
   7 |     
   8 | >>> RUN gem install bundler && bundle install
   9 |     
--------------------
ERROR: failed to solve: process "/bin/sh -c gem install bundler && bundle install" did not complete successfully: exit code: 5

native buildのコンパイルで失敗しておりgemをインストールできません。

必要な依存パッケージ

github.com

リポジトリのRequirementsを見るとCコンパイラlibffi ライブラリが必要だと書いています。
加えて、そもそもmakeができていなかったので make も必要そうでした。

lambda/rubyのbase OSはAmazon Linux 2 なのでパッケージ管理システムはyumです。 したがって、yumで下記のパッケージをインストールすればエラーを解消できそうです。

  • gcc
  • make
  • libffi-devel

Dockerfile(改修後)

FROM public.ecr.aws/lambda/ruby:3.2

# 依存パッケージを追加する
RUN yum update -y && yum install -y gcc make libffi-devel

COPY Gemfile ${LAMBDA_TASK_ROOT}/

RUN gem install bundler && bundle install

無事にbundle installが成功しました。

$ docker build --platform linux/arm64 -t lambda-ruby-test:test .
[+] Building 19.7s (9/9) FINISHED                                                         
 => [internal] load .dockerignore                                                    0.0s
 => => transferring context: 2B                                                      0.0s
 => [internal] load build definition from Dockerfile                                 0.0s
 => => transferring dockerfile: 261B                                                 0.0s
 => [internal] load metadata for public.ecr.aws/lambda/ruby:3.2                      0.0s
 => CACHED [1/4] FROM public.ecr.aws/lambda/ruby:3.2                                 0.0s
 => [internal] load build context                                                    0.0s
 => => transferring context: 28B                                                     0.0s
 => [2/4] RUN yum update -y && yum install -y gcc make libffi-devel                 12.3s
 => [3/4] COPY Gemfile /var/task/                                                    0.0s
 => [4/4] RUN gem install bundler && bundle install                                  6.7s
 => exporting to image                                                               0.7s 
 => => exporting layers                                                              0.6s 
 => => writing image sha256:1234567890                                               0.0s 
 => => naming to docker.io/library/lambda-ruby-test:test                             0.0s 

エンジニア採用面接初心者が参考にするリンク集

近々採用面接担当としての仕事が降ってくる気配あるので、そのためのインプットを行なっている。
せっかくだからその参考リンク集をHackMDに書き出した。
まだしばらくはインプットは続くはずなので更新しやすいHackMDに切り出した。

hackmd.io

株式会社グロービスに入社しました

正確には「株式会社グロービスにエンジニアとして入社して3ヶ月が経ちました」です。 晴れて試用期間が満了したことと、同日‪の4月1日に入社して同じチームで働いている‪ @mktakuya ‬が入社エントリを書いたので後に続こうというお気持ちです。

blog.m6a.jp

あと、つよつよエンジニアの転職エントリはそこらに転がっているけど、そうではないエンジニアの転職エントリも僕は読みたいなと思ったので自分で書くことにしました。

で、誰?

  • @shifumin
  • 新卒で地元のジャパニーズトラディショナルローカルガバメント(notエンジニア) -> 小さなWeb系受託開発会社 -> グロービス
  • Railsエンジニア
  • 主にAPIを作ったりデータモデリング周りを触っていた
  • グロービスに入社してReactも触り始めた

グロービスという会社

recruiting-tech.globis.co.jp

グロービスと聞いて思い浮かぶのは、経営大学院、グロービスMBAシリーズの書籍、法人向け研修、VCといったところでしょうか。
これら(だけではないけど)に加えて、グロービスは2016年にGDP(グロービス・デジタル・プラットフ ォーム)という部署を組織してEdTechの領域に参入しました。
現在提供しているサービスは大きくくくると「グロービス学び放題」と「グロービス・ラーニング・プラットフォーム」で、前者はビジネススキルを学べる定額型動画学習サービス、後者はグロービスの提供している研修・学習システムを集約し一括管理するためのプラットフォームです。
社内のエンジニアの大部分はGDPに集まっています。

入社の経緯

前職は受託開発の会社でずっと自社内でクライアントワークをカタカタやっていたのですが、社内のやむごとなき理由によりある日表参道名刺管理アプリ社にSESとして客先常駐することになりました。
そこで初めてスクラムを体験してプロダクトだけでなく開発プロセスの改善等を通じてチームも成長していくところに「これや!」感を感じ、当事者として関わりたいという思いとともに転職活動を始めました。

業種は特にこだわりはなかったのですが、森博嗣の「今はもうない」の次の一節

舗装された林道が開通し、そこを走る大型トラックによる輸送が、おそらくこの軽便鉄道の使命を奪ったのであろう。廃線になって十年、いやそれ以上経っているに違いない。しかし、別にどうということはない。いつだって、より効率の良いものが、どんなに親しまれ、どんなに美しく伝統的な手法にも、必ず勝る。それがシステムというものだ。ようするに楽であること……、それ以外に人間を魅了するものはない、といっても過言ではない。

はてなダイアリー時代のブログのヘッダーにずっと貼っていたくらい大好きで、要は利用する人が楽できるプロダクトの開発に関わりたい(あわよくば自分も楽したい)という気持ちがあったのと、広告主が見え隠れすると意識がブレそうなので「ビジネスモデルが広告収益モデルでないユーザーから直接お金を頂く」ビジネスモデルの会社がいいなという気持ちと、あとバックエンドがRailsならすぐに力になれそうだという全てを満たすような会社に話を聞きに行きました。ついでに転職ドラフトで指名いただいた会社はとりあえず話を聞きに行ったのでトータルで15社くらいのカジュアル面談を受けた気がします。

カジュアル面談で色々な会社の話を聞きに行ったはいいもののじゃあどの会社の本選考を受けるかの決め手がなくて悩んでいたところ、たまたま去年の僕の誕生日にQiitaが開催していたCareer Meetupに参加して、 @sue738グロービスを紹介している発表を聞くことができました。

logmi.jp

元々学ぶことが好きだったことと、GDPは今参加しても面白そうなフェイズだなと感じたことと、上で上げた条件を全て満たしていることの全てが線で繋がったのでこの船に乗るしかないなと思い選考を受けた結果、ご縁がありグロービスに入社する運びとなりました。
僕は地方出身なのですが、東京に来てから地方って学習モチベがあってもそのため環境が都会に比べて整っていないことを強く実感するようになって、それをどうにかして是正したいということを選考で熱く語った記憶があります。

何をしているか

グロービス・ラーニング・プラットフォームの開発に携わっています。主にはAPIを作成したり、他サービスとの連携部分のコードを書いています。
あと、チームの生産性向上やスクラムマスターに興味ありますと言っていたらスクラムマスターのロールが降ってきたのでスクラムマスターも始めました。

社内の雰囲気

働きやすいです。
内製の開発組織が全くなかった状態から2年数ヶ月でこのエンジニア組織とその制度を整えるのは正直すごいなということをまず思いました。
フレックスタイム、リモートワーク、副業許可、壁一面ホワイトボード、ソファスペース等Web系ベンチャーでよくありそうな制度は大体用意されています。
教育事業を行っているだけあって、エンジニア自体学習意欲が高めな人が多いことを差し置いても学習意欲の高い人が多いと感じました。

もちろん課題もあって、個人的には下記を感じます。

  • 組織拡大による人数の増加・チームの分割等の影響でbiz側dev側の期待値調整・優先順位のすり合わせが弱いことがある
  • サービス開始から数年経ち技術的負債が溜まり始めた

前者はフィットする会議体、組織構成を変化させながら塩梅を模索中、後者は機能開発とバランスを取りながら負債返却にメスが入り始めた状況です。

いい感じに課題が転がっていてまだまだ人が足りなくエンジニアを絶賛募集中なので興味ある方はぜひ下記あたりから応募しましょう!

www.wantedly.com

全方位で募集しているけど、特にiOS、QA、フロントエンドのエンジニアが欲しい雰囲気が社内にあります。 また、色々と中のことをお話しすることもできますのでぜひご飯でも誘ってください。

現場からは以上です。

あとでここ見てって言う用のあれこれ

お金

皆大好きお金の話ですが、アカウントを作れば誰でも指名額を見れる 転職ドラフトによると大体の提示額が分かるかと思います。リードクラスのエンジニアの採用チャネルとして転職ドラフトを利用しているようです。 残念ながら僕は転職ドラフト経由ではないことと1人しか同僚の年収の正確な額を知らないので、実態はよく分かりません。。。

その他

  • Q.エンジニアはどれくらいいる?
    • A.GDPにいるエンジニアは50人くらい(業務委託含む)。毎月2人ずつくらい入社している印象。
  • Q.支給マシン等は?
    • A.MacBook Pro15インチマシマシとDellの27インチディスプレイ(not 4k)1枚
  • Q.リモートワークやフレックスは利用されている?
    • A.""自由と自己責任""に則って結構利用されていると思う。「作業集中のため終日RWします」「荷物受け取りで午前RW、午後から出社します」「通院のため早退します」あたりは毎日のようにSlackの勤怠chで見る。
  • Q.勤怠はどんな感じ?
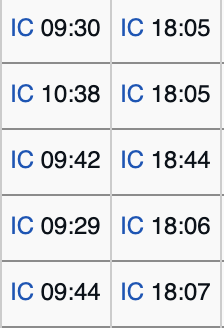
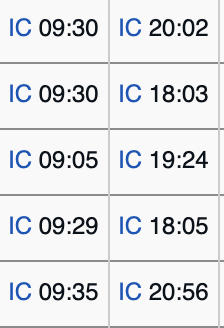
    • A.10時台に来て19時台に帰る人が多いイメージ。みなし残業45時間だけど、実感として残業月10時間くらいのイメージがある(所定は7.5 時間/日)
      • 以下、私の勤怠例。左が標準的な週、右が色々やっていた週の出勤時間と退勤時間。
      • Image from GyazoImage from Gyazo

create_tableでカラムを定義するのと同時にユニークインデックスを貼るやつ

なぜかレビューを通っていた下記のようなmigrationがあったのですが、 unique indexが貼られていなくて(当たり前ですが)先日ひどい目にあいました。

# db/migrate/20181231235959_create_products.rb
class CreateProducts < ActiveRecord::Migration
  def change
    create_table :products do |t|
      # (略)
      t.integer :shop_id, unique: true
      # (略)
    end
  end
end

はい。 ActiveRecord::ConnectionAdapters::TableDefinitioncolumn メソッドの opthionsunique: true を渡してもunique indexは貼られませんね。

create_table でカラムを定義するのと同時に unique index を貼るやつの結論

上記のオプションの渡し方の正解は下記ですね。

t.integer :shop_id, index: { unique: true }

下記でいけるので。

t.type :column_name, index: { unique: true }

下記はだめ。

t.type :column_name, unique: true

そんなオプションの渡し方はない。

ActiveRecord::ConnectionAdapters::SchemaStatements の create_table メソッドのコードを読む

まあ、以上なのですが、せっかくなのでこの部分が実際にどういう実装になっているかを知るために ActiveRecord::ConnectionAdapters::SchemaStatementscreate_table メソッドについて Active Recordのコードを読んでみますか。

読んだ環境はRails 5.2.2 (GitHub - rails/rails at v5.2.2)です。

create_table

https://github.com/rails/rails/blob/v5.2.2/activerecord/lib/active_record/connection_adapters/abstract/schema_statements.rb#L290

def create_table(table_name, comment: nil, **options)
  td = create_table_definition table_name, options[:temporary], options[:options], options[:as], comment: comment
  # (中略)
  yield td if block_given?
  # (中略)
end

yield に渡しているのは td なので、普段 t.integer みたいに書いている tcreate_table_definition で定義されているようだ。

create_table_definition table_name

https://github.com/rails/rails/blob/v5.2.2/activerecord/lib/active_record/connection_adapters/abstract/schema_statements.rb#L1278

def create_table_definition(*args)
  TableDefinition.new(*args)
end

tdTableDefinitionインスタンスだった。

TableDefinition

https://github.com/rails/rails/blob/v5.2.2/activerecord/lib/active_record/connection_adapters/abstract/schema_definitions.rb#L257

class TableDefinition
  include ColumnMethods
  # (中略)
end

ColumnMethods をincludeしている。

ColumnMethods

https://github.com/rails/rails/blob/v5.2.2/activerecord/lib/active_record/connection_adapters/abstract/schema_definitions.rb#L201

module ColumnMethods
  # (中略)
  # Appends a column or columns of a specified type.
  #
  #  t.string(:goat)
  #  t.string(:goat, :sheep)
  #
  # See TableDefinition#column
  [
    :bigint,
    :binary,
    :boolean,
    :date,
    :datetime,
    :decimal,
    :float,
    :integer,
    :json,
    :string,
    :text,
    :time,
    :timestamp,
    :virtual,
  ].each do |column_type|
    module_eval <<-CODE, __FILE__, __LINE__ + 1
      def #{column_type}(*args, **options)
        args.each { |name| column(name, :#{column_type}, options) }
      end
    CODE
  end
  alias_method :numeric, :decimal
end

普段使っているシンタックスシュガーがメタプロで定義されている。
t.integer だと column(name, :integer, options) } なので、結局 column メソッドに options 引数が渡されて実行されている。

column

https://github.com/rails/rails/blob/v5.2.2/activerecord/lib/active_record/connection_adapters/abstract/schema_definitions.rb#L355

def column(name, type, options = {})
  name = name.to_s
  type = type.to_sym if type
  options = options.dup
  # (中略)
  index_options = options.delete(:index)
  index(name, index_options.is_a?(Hash) ? index_options : {}) if index_options
  @columns_hash[name] = new_column_definition(name, type, options)
  self
end

optionsindex キーの中身は index メソッドに引数として渡されている。

index

https://github.com/rails/rails/blob/v5.2.2/activerecord/lib/active_record/connection_adapters/abstract/schema_definitions.rb#L380

# Adds index options to the indexes hash, keyed by column name
# This is primarily used to track indexes that need to be created after the tab
#
#   index(:account_id, name: 'index_projects_on_account_id')
def index(column_name, options = {})
  indexes << [column_name, options]
end

コメントの通りですが、 indexesoptions を追加している。

create_tableに戻る

https://github.com/rails/rails/blob/v5.2.2/activerecord/lib/active_record/connection_adapters/abstract/schema_statements.rb#L314

def create_table(table_name, comment: nil, **options)
  td = create_table_definition table_name, options[:temporary], options[:options], options[:as], comment: comment
  # (中略)
  unless supports_indexes_in_create?
    td.indexes.each do |column_name, index_options|
      add_index(table_name, column_name, index_options)
    end
  end
  # (中略)
end

td.indexes のそれぞれの要素の2つ目の index_optionsadd_index メソッドに index_options として渡している。
結局 add_index が呼ばれていますね。

--

ActiveRecordのコードはこれ以上追いませんが、結局

t.type :column_name, index: { key: value }

index 部分のオプションは

 add_index(table_name, column_name, {key: value})

のように、 add_index にオプションとして渡されるのでした。
そして add_index は unique indexを作成するときは オプションとして unique: true を渡す必要ので、 create_table の中の t.type でunique indexを貼りたいときはオプションとして index をキーにして、

t.type :column_name, index: { unique: true }

としないといけないのでした。

コードを読むのは疲れますが、実際の処理の中身がよく分かるのでこれからも適宜読んでいきたいですね。
こちらからは以上です。

補足

上記で見た、ActiveRecord::ConnectionAdapters::TableDefinitioncolumn メソッドのオプションでunique indexを貼る方法が以外の方法は下記がある。

ActiveRecord::ConnectionAdapters::SchemaStatementsadd_index メソッド

テーブル作成後にindexを追加するやつ。

create_table :products do |t|
  t.integer :shop_id
end

add_index :products, :shop_id, unique: true, name: 'products_shop_id_index'

ActiveRecord::ConnectionAdapters::TableDefinitionindex メソッド

create_tableの中でindexを追加するやつ。

create_table :products do |t|
  t.integer :shop_id  
   
  t.index :category_id, unique: true, name: 'products_shop_id_index'
end

ActiveRecord::ConnectionAdapters::Tableindex メソッド

change_tableでindexを追加するやつ。
create_table 内で利用する1つ上と形は一緒ですね。

change_table :products do |t|
  t.index :shop_id, unique: true, name: 'products_shop_id_index'
end

参考

小さく薄くrails newする

HerokuでRubyスクリプトのような何かを動かす時に、activerecord等は利用したいのでRuby単体ではなくてRailsとしての方が都合がいいのだけどViewやJS関係は特に必要ない。そんな時があります。そんな時がありますね。
そういうわけで、上記のような用途向けのView関連、JS関連のファイルの作成を全てスキップしたrails newのオプション構成を調べました。

確認環境は

です。

結論

結論は下記です。

rails new . --database=postgresql --skip-yarn --skip-git --skip-action-mailer --skip-active-storage --skip-action-cable --skip-sprockets --skip-javascript --skip-turbolinks --skip-test --api --skip-bundle

そして、下記は僕のコピペ用です。

docker-compose run --rm app rails new . --database=postgresql --skip-yarn --skip-git --skip-action-mailer --skip-active-storage --skip-action-cable --skip-sprockets --skip-javascript --skip-turbolinks --skip-test --api --skip-bundle

各オプションの解説

各オプションの概要は下記の通りです。

オプション 効果
--database=DATABASE 使用するdatabaseを指定
--skip-yarn Yarnを利用しない
--skip-git .gitignore を作成しない
--skip-action-mailer Action Mailer関連のファイルを作成しない
--skip-active-storage Active Storage関連のファイルを作成しない
--skip-action-cable Action Cable関連のファイルを作成しない
--skip-sprockets Sprockets関連のファイルを作成しない
--skip-javascript JavaScript関連のファイルを作成しない
--skip-turbolinks turbolinks gemを利用しない
--skip-test test関連ファイルを作成しない
--api APIとして利用するapp向けの小さい構成
--skip-bundle bundle installを実行しない

詳しくは

rails new --help

でどうぞ。

補足しておくと、

  • 予め .gitignore は用意しているので デフォルトの .gitignore は作成しない ( -skip-git )
  • どうせ後でRspecをインストールするので標準のtest関連ファイルは必要ない ( --skip-test )
  • どうせ後でGemfileに必要なgemを追加して bunde install するので bundle install しない ( --skip-bundle )

こちらからは以上です。

参考情報

参考までに、上記オプション付与時にremoveされるファイルは下記の通りです。
ちゃんとどのファイルが削除されるのか表示されて便利だ……。

rails new . --database=postgresql --skip-yarn --skip-git --skip-action-mailer --skip-action-cable --skip-sprockets --skip-javascript --skip-turbolinks --skip-test --api --skip-bundle
  (中略)
      remove  app/assets
      remove  lib/assets
      remove  tmp/cache/assets
      remove  app/helpers
      remove  test/helpers
      remove  app/views
      remove  public/404.html
      remove  public/422.html
      remove  public/500.html
      remove  public/apple-touch-icon-precomposed.png
      remove  public/apple-touch-icon.png
      remove  public/favicon.ico
      remove  app/assets/javascripts
      remove  config/initializers/assets.rb
      remove  app/views/layouts/mailer.html.erb
      remove  app/views/layouts/mailer.text.erb
      remove  app/mailers
      remove  test/mailers
      remove  app/assets/javascripts/cable.js
      remove  app/channels
      remove  config/initializers/cookies_serializer.rb
      remove  config/initializers/content_security_policy.rb
      remove  config/initializers/new_framework_defaults_5_2.rb
      remove  bin/yarn

また、作成されるGemfileとデフォルトのGemfile( Gemfile.default )の差分は下記となります。

デフォルトのGemfileと比べると、sass-rails , coffee-rails から始まって web-console , またtestの capybara , selenium-webdrive に至るまでViewに関するgem一式が削除されていることがわかりますね。
(はてなブログのdiffのhighlight見づらいな……)

git diff --no-index -U10 Gemfile.default Gemfile
diff --git a/Gemfile.default b/Gemfile
index e45e610..c5441b8 100644
--- a/Gemfile.default
+++ b/Gemfile
@@ -1,62 +1,40 @@
 source 'https://rubygems.org'
 git_source(:github) { |repo| "https://github.com/#{repo}.git" }

 ruby '2.6.0'

 # Bundle edge Rails instead: gem 'rails', github: 'rails/rails'
 gem 'rails', '~> 5.2.2'
 # Use postgresql as the database for Active Record
 gem 'pg', '>= 0.18', '< 2.0'
 # Use Puma as the app server
 gem 'puma', '~> 3.11'
-# Use SCSS for stylesheets
-gem 'sass-rails', '~> 5.0'
-# Use Uglifier as compressor for JavaScript assets
-gem 'uglifier', '>= 1.3.0'
-# See https://github.com/rails/execjs#readme for more supported runtimes
-# gem 'mini_racer', platforms: :ruby
-
-# Use CoffeeScript for .coffee assets and views
-gem 'coffee-rails', '~> 4.2'
-# Turbolinks makes navigating your web application faster. Read more: https://github.com/turbolinks/turbolinks
-gem 'turbolinks', '~> 5'
 # Build JSON APIs with ease. Read more: https://github.com/rails/jbuilder
-gem 'jbuilder', '~> 2.5'
-# Use Redis adapter to run Action Cable in production
-# gem 'redis', '~> 4.0'
+# gem 'jbuilder', '~> 2.5'
 # Use ActiveModel has_secure_password
 # gem 'bcrypt', '~> 3.1.7'

-# Use ActiveStorage variant
-# gem 'mini_magick', '~> 4.8'
-
 # Use Capistrano for deployment
 # gem 'capistrano-rails', group: :development

 # Reduces boot times through caching; required in config/boot.rb
 gem 'bootsnap', '>= 1.1.0', require: false

+# Use Rack CORS for handling Cross-Origin Resource Sharing (CORS), making cross-origin AJAX possible
+# gem 'rack-cors'
+
 group :development, :test do
   # Call 'byebug' anywhere in the code to stop execution and get a debugger console
   gem 'byebug', platforms: [:mri, :mingw, :x64_mingw]
 end

 group :development do
-  # Access an interactive console on exception pages or by calling 'console' anywhere in the code.
-  gem 'web-console', '>= 3.3.0'
   gem 'listen', '>= 3.0.5', '< 3.2'
   # Spring speeds up development by keeping your application running in the background. Read more: https://github.com/rails/spring
   gem 'spring'
   gem 'spring-watcher-listen', '~> 2.0.0'
 end

-group :test do
-  # Adds support for Capybara system testing and selenium driver
-  gem 'capybara', '>= 2.15'
-  gem 'selenium-webdriver'
-  # Easy installation and use of chromedriver to run system tests with Chrome
-  gem 'chromedriver-helper'
-end

 # Windows does not include zoneinfo files, so bundle the tzinfo-data gem
 gem 'tzinfo-data', platforms: [:mingw, :mswin, :x64_mingw, :jruby]

参考リンク

qiita.com

列車運行情報を取得するgemを作った

関東エリアの列車の運行情報を取得するgemを作りました。
標題は目的語が大きく、情報を取得できるのは関東エリアのみです(大事なことなので)

github.com traininfo_kanto | RubyGems.org | your community gem host

インストール

Gemfileに下記の行を追加して bundle install するか、

# Gemfile
gem 'traininfo_kanto'

あるいは、直接gemをインストールしてください。

gem install traininfo_kanto

使い方

# app.rb
require 'traininfo_kanto'

TraininfoKanto.get(['山手線', '京浜東北線'], url: true)

こんなコードを用意しておいて

$ ruby app.rb

実行すると

["山手線は平常運転です。", "京浜東北線は列車遅延があります。\n宇都宮線内でドア点検を行った影響で、一部列車に遅れが出ています。 (9月21日 16時45分掲載)\nhttps://transit.yahoo.co.jp/traininfo/detail/22/0/"]

が返ってきます。

url オプションがあり、 true にすると「平常運転」以外の場合に最後に詳細ページのリンクを追加します(デフォルトは false )

コマンド

CLIも用意しているので、コマンドライン上で

$ traininfo_kanto get 山手線 京浜東北線
山手線は平常運転です。
京浜東北線は列車遅延があります。
宇都宮線内でドア点検を行った影響で、一部列車に遅れが出ています。 (9月21日 16時45分掲載)

みたいな感じでも使えます。 CLIでは url オプションはなしです(そのうち実装するかも)

Docker

shifumin/traininfo_kanto - Docker Hub

Docker Hubにイメージを上げたので、Dockerの実行環境があれば

$ docker run --rm shifumin/traininfo_kanto get 山手線 京浜東北線

で試すことができます。
Rubyの環境すら必要ありません。
便利ですね。

どうやって情報を取得しているか

単純にYahoo!路線情報の運行ページ{:target='_blank'}をnokogiriでスクレイピングして情報を取得しています。

やりたかったこと

要はこういうことをやりたかったんですよね。

f:id:shifumin:20181010200426p:plain

上記はうちのSlack botです。
で、運行情報取得部分だけgemに切り出しました。

注意点

さて、注意点があります。
関東の運行情報と言いながら現時点(2018年10月9日)でサポートしている路線は下記だけです。
(メトロ、都営とJRの僕が利用しそうな路線と後小湊鉄道だけ)
JRは頑張って後で追加します。私鉄は……w

Supported routes

まだできていないこと

  • サポートしている路線の数が少ない
    • せめてJR東日本(関東)の路線は全てカバーしたい
  • テストを全く書いていない
    • gemのテストの知見を得たいので書きたい
  • CLItraininfo_kanto list (運行情報を取得できる路線一覧を取得する)のサブコマンドくらいは流石に実装したい
    • 実装します

終わりに

Rubygems作成とDockerHubにDocker imageアップロードは初めてでしたが、学びがありよかったです。
こちらからは以上です。